.png)


SERVICE GUIDE BTIS1/BTST02 BTDS76P/BTDS108P


Are there any fire hazards using this smoker and how do I prevent it?
The Bradley Smoker is a safe appliance, but like any appliance that is used for cooking, there is always the potential for fire. One should carefully read the “Important Safety Warnings” that come in the Bradley Owners Manual. In the Bradley’s Owner’s Manual, it states “When in use - Do not leave the smoker unattended”.
Most known causes occur when the owner mistakenly installs the drip tray improperly (more commonly called the “V” Shaped Drip Tray); refer to the Owner’s Manual for the proper installation. A new owner may get confused as to how to install the "V" tray, because this tray is packaged upside down for shipment. That is another reason to make sure you read the Owner’s Manual. You will find the proper installation of the "V" tray in the "Assembly Instructions" section. The V-Shaped drip tray should be installed like a valley not up like a roof top.
The other known cause is not emptying and refilling the drip bowl frequently enough. If the bisquettes are not emptied, they pile up in the bowl and are not extinguished leaving hot bisquettes exposed.
- If you suspect there is a fire in your smoker:
- Suffocate it! Close or cover the vent and LEAVE THE DOOR CLOSED!
- UNPLUG the smoker.
- While waiting for the fire to asphyxiate, call the local fire department.
- It is well advised to have a type ABC portable fire extinguisher nearby. It's not advisable to use water on it because combustible liquids are involved and water applied improperly could actually cause the fire to spread beyond the smoker cabinet.
- Further Safety Precautions:
- Go to the Bradley website and download the most recent version of the Owner’s Manual. Read the “Important Safety Warnings” and “Important Safety Precautions” sections contained in the manual.
- Empty drip bowl of burnt wood bisquettes and refill with fresh water; Bradley recommends every 2 to 3 hours.
- It is recommended that a fire extinguisher be placed near the smoker. Refer to your local authority to determine proper size and type of fire extinguisher.
- Do not cover or seal the racks or drip tray with aluminum foil. This can cause heat to build up and severely damage your smoker.
- Do not place bottom rectangular tray anywhere but on the floor of the smoker.
- Place extinguished bisquettes at a safe distance from all structures and combustible materials.
- Do not use near gasoline or other flammable liquids, gases, or where flammable vapors may be present.
- For outdoors use only. Do not operate in an enclosed area.
How do I set up and season my new Smoker?
The seasoning steps are also located in your Owner’s Manual.
- Wash / dry all the racks, drip tray, drip bowl, bottom rectangular tray and place in smoker.
- Plug in smoker, turn on smoke generator, push temp slider control halfway to the right. For the digital set temperature to 150 degrees F (66 C). Preheat the smoker for 20 minutes.
- Load the feeder tube with 5 bisquettes of your favourite wood (if you purchased the variety pack, I would go with “special blend”) and fill the drip bowl half full of water bowl.
- Press Bisquette Advance Button until a bisquette is on the burner (you will need to push the button 3 times letting it cycle between each push of the button ).
- Close door and open the top damper half way.
- Smoker should be at 150 degrees F. If the temperature is higher adjust the temperature heat control. Smoke the tower continuously until the bisquettes run out; after about one hour. Five (5) bisquettes will equal one hour of smoke - the last 2 bisquettes will not advance onto the Burner.
What parts should I clean on my Bradley Smoker?
Clean the racks, drip bowl, the V shaped drip tray, and the bottom rectangular tray the drip bowl sits on. Usually a soak in some hot soapy water will do it. I have used a SOS pad or steel wool on the V-pan when it gets really bad.
The other thing you want to wipe off is the door seal and it’s mating surface on the smoker tower. I use a rag and soapy water to wipe it down. If you don’t wipe down the door seal it may stick to the mating surface and over time tear the seal.
After a number of smokes you will also notice a build up on the vent on top of the smoker. This can be cleaned by taking the screw out and wiping it down with denatured alcohol or soapy water. (The denatured alcohol also works well cleaning the door seal).
Remove food particles and grease residue from the smoker. If the inside of the cabinet starts to flake, use a soft bristle brush and gently brush the loose particles from the walls.
Use a damp rag to wipe up any juices or grease that may have spilled inside the smoke tower. Clean the bisquette burner with a fine wire brush if a build up occurs.
Why won’t my smoker reach the desired temperatures?
The Bradley Smoker has a 500 watt heating element, and if you add the bisquette burner from the generator that adds another 125 watts to cook with. The smoker is designed to smoke/cook at temperatures between 200 – 250 degrees F therefore on most occasions that is more than enough heat to get the job done. But you may come across many occasions in which you need the smoker to recover and reach the desired temperature quickly.
Here are some things you can do:
Keep in mind that the ambient air temperature and wind will affect the cooking temperature of the smoker. Protecting the smoker from these elements will help the smoker reach the desired smoking/cooking temperature. Sometimes direct sunlight can be your friend and help the smoker reach its desired temperature faster. Avoid opening the door too often. Each time you open it a great deal of heat escapes, and some estimate that each time the door is opened plan on adding at least another 30 minutes of cooking time. With thinner cuts of meat such as ribs, fillets etc. opening the door to baste may be alright. Usually the cabinet temperature recovers fairly fast when these types food are in the smoker.
Leave space on each rack in between your food for heat and smoke to rise.
Use a separate digital probe thermometer to monitor the cabinet temperatures, and remember that the heat is higher closer to the heating element and towards the back of the smoker. Preheat the smoker for at least 20 minutes before placing your food in it. Many owners preheat 30 degrees F to 50 degrees F higher than they plan to cook at. During loading you will lose 30 – 50 degrees F in heat. Try closing the vent slightly, but make sure that no smoke is backing up into the generator (if smoking chicken with skin, try opening the vent). When refreshing the drip bowl use hot water (always be careful carrying and pouring hot water).
Temperature Swing
The Bradley Smokers do have a temperature swing to them. This is in part because of the way the smoker Works. It will give the heat element full power until the sensor reaches its set temperature then it turns the power off. But the heat element is red hot so the temperature will climb slightly higher than the set point. It will do the opposite when it cools down the unit will stay off until the sensor reads its set point then it will turn the power back on to the heat element. In the mean time the element has gone cold, so the temperature will go below your set point.
This is called the temperature swing. It will show up much more at low temperatures and also with a empty smoker will make it worse.
This is exaggerated by the fact that the smoker has very low heat mass. When you fire up a big smoker made of thick steel, once it is heated up, you can open the door to work on the meat and the temperature does not take a nosedive - because of the heat stored in the thick steel. Most food smokers from the smallest to the largest all have temperature variances. After you use it for a little while I think you will get used to how it operates and it should be fine.
What is the purpose of the vent and how should I adjust it?
The vent (damper) opening is very important in controlling the flow of smoke, temperature, moisture, avoiding damage to the generator, and for the original models avoiding possible damage to the temperature circuit board. Different users have different preferences, and you will see openings from 1/4 - 3/4 open; and for jerky you will see fully opened.
When in use; never smoke or cook anything with the vent completely closed. This can cause moisture to build up within the smoker and will cause smoke and moisture to back up into the generator, possibly causing damage to the mechanism. Also for the Original Smoker models, this will cause liquid to seep out of the bottom of the door, where the temperature heat control switch is located. At a minimum the vent should be open wide enough so you will not notice any smoke backing up into the generator or have any liquids coming out of the front.
Here’s a general guideline to get you started. As you become more experienced you will develop you own settings:
- Closed: only when in storage, never leave closed when unit is being used.
- 1/4 - 1/2: most foods that are low in moisture, and for higher temperatures.
- 1/2 - 3/4: for foods with high moisture such as chicken with skin, or for those living in a humid climate,
- or to help keep the cabinet temperature down (low moisture foods).
- Some report using the wider opening makes the food less dark and gives it a nice mahogany color.
- Fully Open: mainly used for cold smoking, making beef jerky, or during the drying period for sausage and hams etc.
Bisquettes do not burn completely. Is this normal?
After the bisquette is burnt, is should retain its shape, but noticeably be reduced in size. If you break one in half it should have a blackish color throughout. If not, you may not have preheated the burner long enough the burner may have a residue build-up, or your generator may not be cycling your bisquettes at regular 20 min. intervals.
If only the first couple of bisquettes show signs of partial burning, that is a good indicator that you did not preheat the burner, or did not preheat it long enough. Turn the generator on and preheat the burn at least 20 minutes prior to loading the feeder tube. I don’t load my feeder tube until I am ready to start smoking, so I turn my generator on when I preheat the cabinet.
If you do this with the digital you will have to reset your smoke time when you load the feeder tube.
If all bisquettes consistently or intermittently show signs of partial burning; it could be caused by a dirty bisquette burner plate. You will need to clean the face of the burner plate off. The best way to clean it is to use a wire brush, and gently brush off any residue buildup. The use of denatured alcohol helps with the tough areas; just make sure your burner plate is cool.
Consistent or intermittent signs of partial burning could also be a sign that the burner not getting enough voltage. Check to see if other electrical equipment is plugged into the circuit. The smoker should be plugged into its own dedicated wall circuit. If not try unplugging or not running some appliances that share the same circuit; if that is an option. If you are using an extension cord, use the shortest cord possible, and make sure it is at least a gauge 12.
.png)
Why do my bisquettes advance using the Advance Button, but are not properly advancing automatically every 20 minutes?
This could be caused by a defective or dirty Internal Advance Switch. Open the generator and clean the switch with some electrical contact cleaner, especially clean the black push button on the side of the switch.
.png)
Why won’t my bisquettes advance when I push the Advance button?
Check the drive guide and clear all loose wood chips. By regularly cleaning the smoke generator, bisquette jamming and undue wear and tear can be avoided.
You can clean the generator by using a vacuum cleaner with a nozzle attachment or use compress air to blow the particles out.
After approximately three months of usage , after unplugging the generator, take it apart, and give it a more thorough cleaning.
.png)
There is no power to smoker, what should I do?
Check that all plugs are correctly and firmly inserted into sockets.
Check fuse (located on smoke generator).
Check to make sure the outlet, Ground Fault Circuit Interrupter (GFCI), has not been tripped.
.png)
.png)
Why can’t we use foil in the smoker?
You can wrap your meat in foil, just don’t cover your racks, or drip tray in foil. The reason for this is that the heat will be blocked below the items you are smoking/cooking, therefore not getting up to temperature. This could also cause other damage to the unit.
Use common sense when loading your racks with food leave enough space around your food to allow the smoke and heat to rise up through the damper, since this is a natural draft smoker.
Why won't my Digital Bradley Smoker turn on; (either the smoke generator or the main cabinet)?
Once you have plugged it in, you have to turn on the oven on/off button on the right hand side of the display and you have to turn on the smoke on/off button on the left hand side of the display. Some people have problems pushing the button. Sometimes it's either not pushing hard enough or not pushing in the middle of the button can be a problem because the pressure sensitive portion of the switch is in the very center of the button. Try pushing the on/off button’s with the tip of your finger, thumb or knuckle.
.png)
If it still does not turn on;
Check that all plugs are correctly and firmly inserted into sockets.
Check fuse (located on smoke generator). Check to make sure the outlet,
Ground Fault Circuit Interrupter (GFCI), or Housebreaker has not been tripped. Open the Generator and check all connections inside
Why does my Digital Bradley Smoker display an “E” error on the screen?
An “E” message is letting you know that there is something wrong with the bisquette advance system.
This could be two different problems.
- Does the motor continually run? (Keeps advancing Bisquettes)
If yes open the generator and look at the internal advance switch. (Grey rectangle shaped switch located on the right hand side of the motor.)
First, make sure that the wires to the switch are connected and firmly seated into the connector. Secondly make sure nothing is blocking that switch and the motor arm.
The motor should stop when the brass arms on the motor depresses the black button on the switch.
If the motor continues to advance the motor needs to be moved closer to the switch by losing the two mounting screws and moving the motor closer to the switch. If the motor continues to turn you have a defective Internal Advance Switch.
- Motor does not advance but gives an E Error
Check the connection between the motor and the control box in the bottom of the generator. Make sure the wires are pushed firmly into the connector.
.png)
Why does my Digital Bradley Smoker display an “E1” error on the screen?
The E1 error is usually an issue with the sensor cable (skinny single prong wire between generator and tower).
Unplug the sensor cable and check to make sure the ends are clean and dry. Re-plug it in a couple of times or even unplug and reverse it, it will usually help. Then check the connection; by wiggling one side of the connection and then the other. If the “E1” message temporally goes away while you were wiggling one side, you need a new sensor plug. (This is the female plug that the sensor cable plugs into)
If this does not correct the problem, you will have to open the generator up and check the connections. Also, remove the back cover of the tower and check the connections inside as well. There are only three components that will cause an E1 error.
.png)
How to open and clean the smoke generator
How do I clean my generator?
.png)
Shown is the generator for the Original Bradley Smoker. The same cleaning technique can be used on the digital generator.
- On a regular basis the generator can be cleaned by using compressed air to blow most of the wood particles out. Eventually it is a good idea to take off the generator cover and give it a good cleaning. I take mine apart about twice a year; usually in May, and again in late October. A good thorough cleaning to remove smoke residue will prevent bisquettes from jamming and undue wear and tear can be avoided.
- To open the generator up, first makes sure it is unplugged and the feeder tube is detached. Then turn it over and remove the 8 screws on the bottom that are on the outside edge. Next stand the generator up- rite and carefully pull the cover slightly up and backwards. It should open like a clam shell, and the cover will still be connected to the base by a few wires. Note how the feeder tube holder is positioned, and remove it.
- If the thread in the generator are stripped the screw may turn, but will not come out. If this happens use needle nose pliers the grasp the screw, and while pulling upward twist the screw. Repeat this action until you can grasp it with your fingers, and continue to pull upward and twist until the screw is removed.
.png)
Bottom of generator with the 8 screws removed. Note the 6 inner screws are left intact.
.png)
Note the wires that still attach the cover, and to the base. Also take note of where the feeder tube holder is positioned.
Use a small brush (a cheap BBQ brush from the dollar store works well) and small vacuum or compress air to remove all wood particles that are inside the generator. Use small pieces of cloth, Q-Tips and 90% isopropyl alcohol or denatured alcohol to clean any residue that is remaining. Make sure you clean the drive (more commonly called the shuttle, the part that pushes the bisquettes) and drive guide (drive guide is the part that the bisquettes travel on to get to the bisquette burner). To clean the track edges and to get into tight corners of the drive guide use the pointed end of a bamboo skewer. The front of the drive (shuttle) will tilt up so that you can get the skewer underneath it. For stubborn built up residue on the drive guide and heat pad a Dremel with a wire brush attachment does a great job.
-
- Make sure to wear safety goggles when using the Dremel. The residue comes off in tiny pieces, and sting when they hit your skin. Also do not use the alcohol to clean around the front of the generator. The alcohol will remove the painted lettering and logo.
.png)
- Make sure to wear safety goggles when using the Dremel. The residue comes off in tiny pieces, and sting when they hit your skin. Also do not use the alcohol to clean around the front of the generator. The alcohol will remove the painted lettering and logo.
Shown prior to cleaning with feeder tube holder removed. Note the debris and residue build up.
4.Once cleaned it is time to reassemble. First make sure that all wires are securely connected. Next reattach the feeder tube holder; making sure it is positioned properly. When positioned correctly it will be held in place by three pins, and can only be seated correctly in one position.
.png)
Picture shows the three pins that hold the feeder tube holder. The stick is the bamboo skewer I used to clean tight places such as edges and corners.
5. Now replace the cover. When replacing the cover make sure that no wires will be in the way of the rotation of the drive arm. On the base of the generator and the top edge of the cover, there are two notches located on the top. When reassembling the generator, make sure that the top edge of the cover fits into those notches.
.png)
This picture shows the notches of both the cover and base.
.png)
This picture shows the notches aligned and partially put together. The top need to be pushed down about another 1/4 inch.
Once positions slightly push down until the top is fully seated. Turn the generator over and replace the screws. Do not over tighten or you will strip the thread in the base. You only need to get the screws snug; the washers will prevent them from loosening.
.png)
-
- After awhile you are likely to strip the threads in the generator. Sometimes wedging a toothpick in the hole prior to starting the screw will keep it tight. This picture shows a toothpick that I used to tighten that screw, the toothpick will be snapped off. If you take a close look at the top screw on the left, you will see a piece of toothpick I used to secure that screw
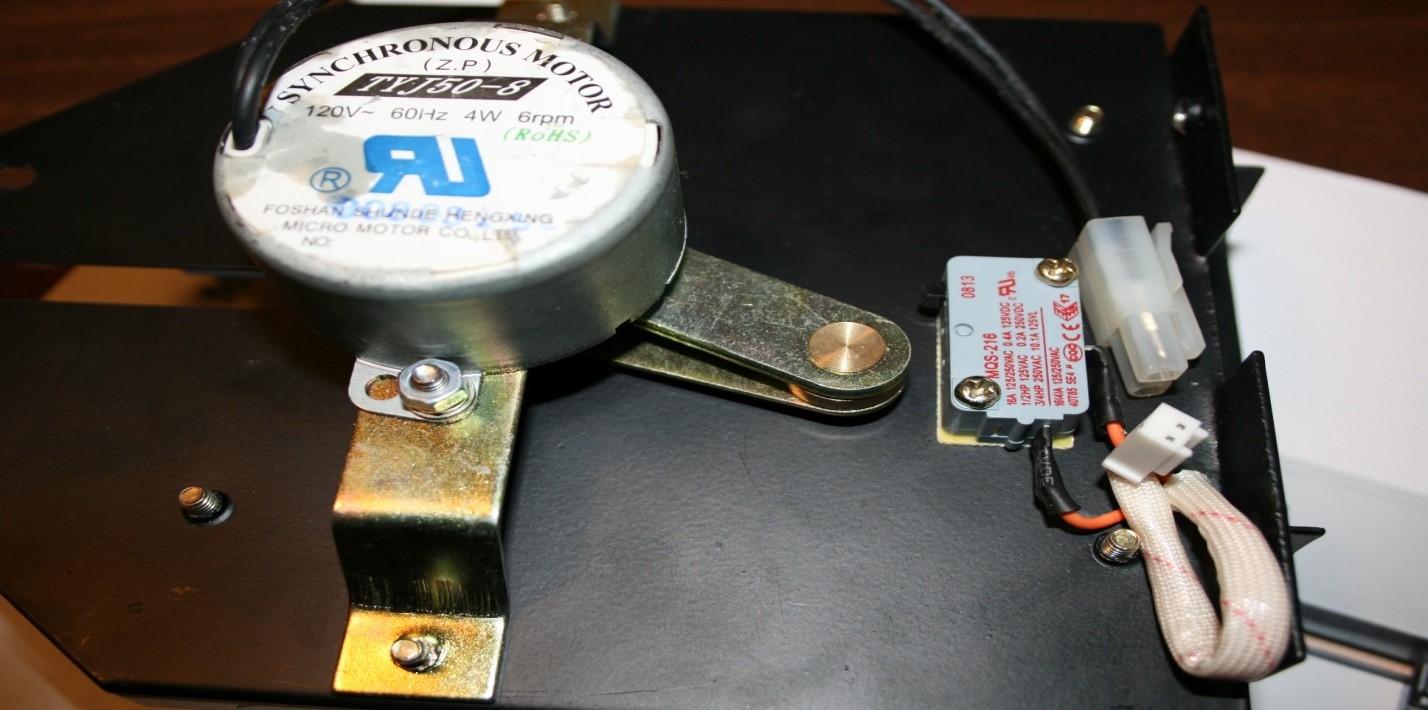
Replacing the Generator Motor
First remove the 8 screws on bottom of generator around the outside edge. Stand the generator right side up and pull up on the top it will open into two parts. Locate the black wires leading from the motor, and unplug them. Next remove the two screws out on either side of motor mounting bracket. With a set of needle nose pliers remove the “C” clip from the motor arm. This will free up the arm from the bisquette advance mechanism. To install new motor, follow these instructions in reverse. After the motor is installed make sure the motor arm is making contact and clicking the little black button on micro switch. If not loosen the screws on switch to move closer to motor, until contact is made.
Replacing Digital Temp Sensor
To replace the temp sensor in your digital smoker remove the back panel of the smoker by removing the screws holding the back panel on.
Carefully remove the back panel as there are wires attached to it. Locate the sensor about half way down middle of smoker inside the back panel.
.png)
Disconnect the wire connector indicated by the arrow, and remove the nuts holding the bracket with the inline fuse and sensor to the screws inside the smoker. Replace with new sensor and reconnect wires, replace nuts and screw back panel back on and you should be all set.
How to Remove & Install a Lower Face Plate
Open the door of the smoker and remove the three mounting screws on top
Lay the smoker on its back exposing the bottom. There you will see three more screws holding the face plate to the smoker tower. Take those screws out and remove the face plate. Next, disconnect the wires (see diagram). Connect the wires to the new face plate. Finally, position it back into place and screw in the six screws.
.png)
How to replace bisquette burner
Remove 8 screws around outside edge of the bottom of generator. Open generator then remove the 2 screws holding the burner to the case.(see picture) Carefully unplug the connector plug and replace with new burner connect new plug and screw into place, and close up generator.
.png)
Heat Element Replacement
To replace the heating element, first remove the 4 screws holding the reflector in place. Remove the reflector, and top portion of each insulator on each side of the element. Next, remove the heat element protective cage; gently pull the element towards you, do not pull it out to far you will pull the wires off the back plug in the smoker tower. Carefully remove the connecting nuts and washer at each end of the element. Slide electrical wires off each end of the element, replace with new element, as well as wires, washers and connecting nuts.
Place the element back in the slot where it came from, put protective cage back in place, as well as the insulators and heat shield. When replacing the screws they only need to be snug. DO NOT OVERTIGHTEN YOU WILL BREAK THE INSULATORS.
.png)
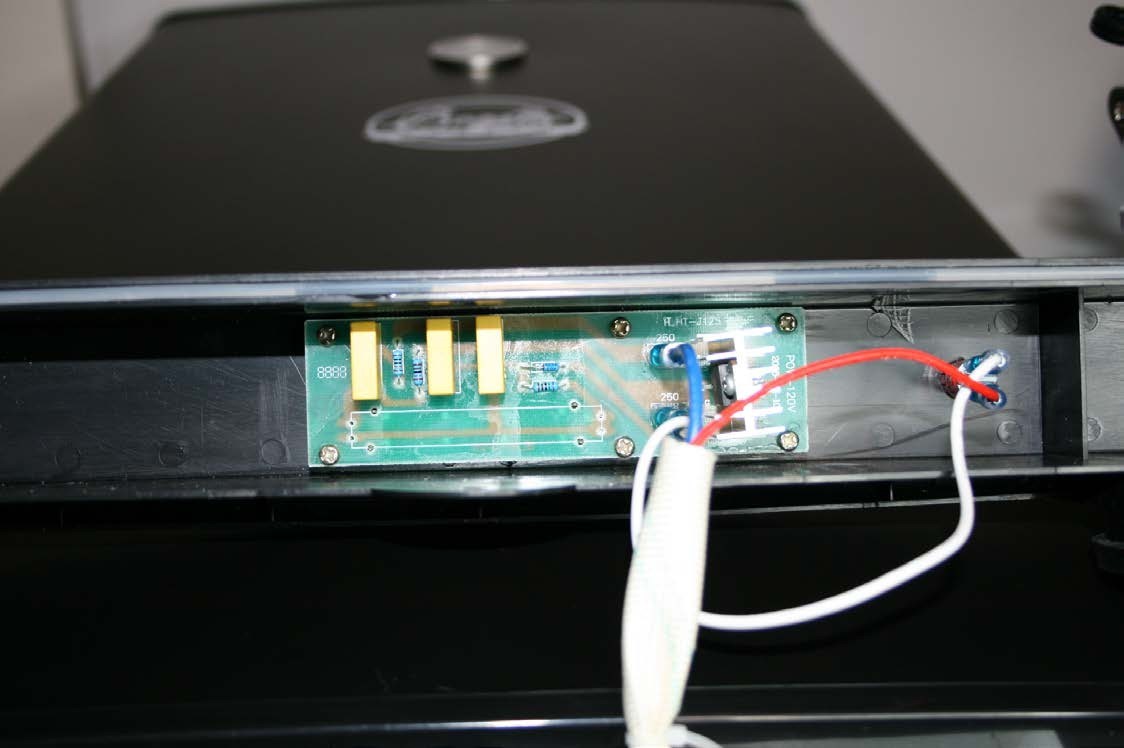
HOW TO CHECK THE INLINE FUSE IN A BTIS1/BTST02
Unplug the smoker
Remove the back cover of the smoker tower
.png)
The In Line Fuse is located on the Red Wire inside the clear plastic tube
.png)
To test the Fuse with a meter, set your meter to a continuity setting and place your probes one on either side To test with an ohm meter place one probe on either side the reading should be about 0.2 ohm
Internal Advance Stop Button (Micro Switch)
Open the generator by taking out 8 screws on the bottom of the generator. Locate the motor. Next to the motor is a little grey switch. Remove the 2 screws holding it in place, unplug the connector, replace with new switch and close up generator.
.png)
Temperature Control Switch Wiring
Wiring viewed from back side of the switch
Comments (1)
By: Steve on 17 November 2025I'm attempting to change my element but running into a problem. I've removed the 4 screws, the reflector, the top portion of each insulator and the protective cage but I still can't pull out the element as there's a bracket holding it. Someone on the Bradley FB page said it's the grounding strap and that it needs to be undone. The problem is that a stubby screwdriver isn't small enough to get under the bracket to hold it in place while undoing the nut.


